

Cooking a tomahawk steak at home can deliver restaurant-quality results without the hefty price tag. This cut, known for its dramatic rib bone and rich marbling, offers a buttery texture and intense beef flavour. Here’s what you need to know to perfect it:
- Choose wisely: Look for bright cherry-red colour, even marbling, and a large ribeye cap for maximum flavour.
- Prep like a pro: Dry brine the steak 12–24 hours in advance for deeper seasoning and a perfect crust. Let it reach room temperature before cooking.
-
Master the method:
- Reverse sear: Slow-cook in the oven, then sear in a hot skillet.
- Grill: Use a two-zone setup for a smoky char.
- Sous vide: Cook with precision, then finish with a quick sear.
- Tools matter: Use a cast iron skillet, meat thermometer, and heavy-duty tongs to ensure even cooking and a golden crust.
- Rest and slice: Rest the steak for 10–15 minutes, then slice against the grain for tenderness.
Each method brings out unique flavours and textures, making it easy to impress at your next meal. Whether you prefer the smoky grill, precise sous vide, or foolproof reverse sear, the key is quality meat, proper preparation, and attention to detail. Ready to elevate your steak game? Let’s dive in.
What Is a Tomahawk Steak and How to Select One
Characteristics of the Tomahawk Cut
A tomahawk steak is essentially a ribeye, but with a dramatic twist - it comes with a long rib bone, anywhere from 12.7 to 30.5 centimetres (5 to 12 inches) in length. This bone, cleaned of meat and fat in a process called "frenching", gives the steak its signature axe-like appearance. Beyond its striking look, the bone serves a practical purpose too. During cooking, it acts as an insulator, helping to keep the meat around it juicy and tender.
The steak's appeal doesn't stop at its looks. Its muscle composition is another standout feature. The cut includes the spinalis dorsi, also known as the ribeye cap, which is often praised as the most flavourful and tender part of any steak. As Chef Hugh Acheson explains:
This cap is universally known as the single most flavourful and tender cut.
Additionally, the steak contains the longissimus dorsi, or centre eye, which is rich in marbling. This marbling melts during cooking, giving the steak a buttery, melt-in-your-mouth texture.
Selecting Quality Meat
Knowing what makes a tomahawk steak special can help you pick the best one. Start by examining the colour and marbling. A high-quality tomahawk will have a bright cherry-red colour with no grey or brownish spots. The marbling - those white streaks of intramuscular fat - should be evenly distributed, as it’s the key to both flavour and tenderness.
Pay close attention to the spinalis muscle. The larger this cap is, the more flavourful your steak will be. Also, consider the meat-to-bone ratio. Since you're paying by weight, you’ll want a steak with plenty of meat relative to the bone.
For the best flavour and quality, choose ethically sourced beef. Suppliers like Fin & Bone prioritise transparency and traceability, ensuring the meat comes from animals raised in good conditions. As Nagi from RecipeTin Eats puts it:
Animals that lived a good life will produce better-tasting meat.
Storage and Thawing Guidelines
Proper storage is essential to maintain the quality of your tomahawk steak. Keep it in its original packaging and store it in the coldest part of your refrigerator until you're ready to cook. If you plan to dry brine the steak, place it uncovered on a rack in the fridge for 12 to 24 hours.
For frozen tomahawk steaks, patience is key. Thaw them in the refrigerator for 24 to 48 hours before cooking. This slow method ensures the meat retains its texture and prevents it from drying out.
sbb-itb-3031837
How to cook a TOMAHAWK steak perfectly, every single time
Preparing Your Steak Before Cooking
The steps you take before cooking your tomahawk steak can transform it from just good to absolutely unforgettable. These methods not only season the meat but also help it cook evenly and develop that irresistible crust.
Dry Brining with Salt
Dry brining is a game-changer when it comes to flavour. By salting your steak 12–24 hours before cooking, you allow the salt to draw moisture to the surface. This moisture dissolves the salt, creating a brine that gets reabsorbed into the meat. The result? A steak that's seasoned all the way through, with tenderised muscle fibres and a dry exterior perfect for a golden-brown crust. Chef Pete Geoghegan from Four Sixes Ranch Brand Beef shares this tip:
Salt early so it has time to absorb and flavour the steak.
For best results, use kosher or coarse cooking salt - steer clear of fine table salt, as it can easily over-season. Place the salted steak on a wire rack over a baking sheet, uncovered in the refrigerator. This setup ensures proper air circulation and prevents the underside from getting soggy. Before cooking, let the steak come to room temperature to ensure even cooking.
Bringing to Room Temperature
Once your steak has been dry brined, take it out of the refrigerator about 30–60 minutes before cooking. Allowing the steak to reach room temperature ensures it cooks evenly, avoiding a cold centre while the outside cooks too quickly. Plus, it helps the surface reach a searing temperature faster, which is key for that perfect crust. Barney Desmazery, Food Editor at BBC Good Food, advises:
Take the steak out of the fridge about 1 hour before cooking... This will help the seasoning permeate deep into the meat, instead of just seasoning the surface.
Drying the Surface
A dry surface is essential for achieving a proper sear. Moisture on the steak's surface causes the heat from your pan or grill to evaporate the water first, which can result in a steamed, pale exterior rather than a beautifully browned crust. To avoid this, pat the steak dry with paper towels right before cooking. Daniel Gritzer, Editorial Director at Serious Eats, emphasises:
Water is the enemy of browning. Yes, you can and should dry them off with towels... but you'll never dehydrate the meat's surface as well as the other methods do.
3 Cooking Methods for Tomahawk Steak
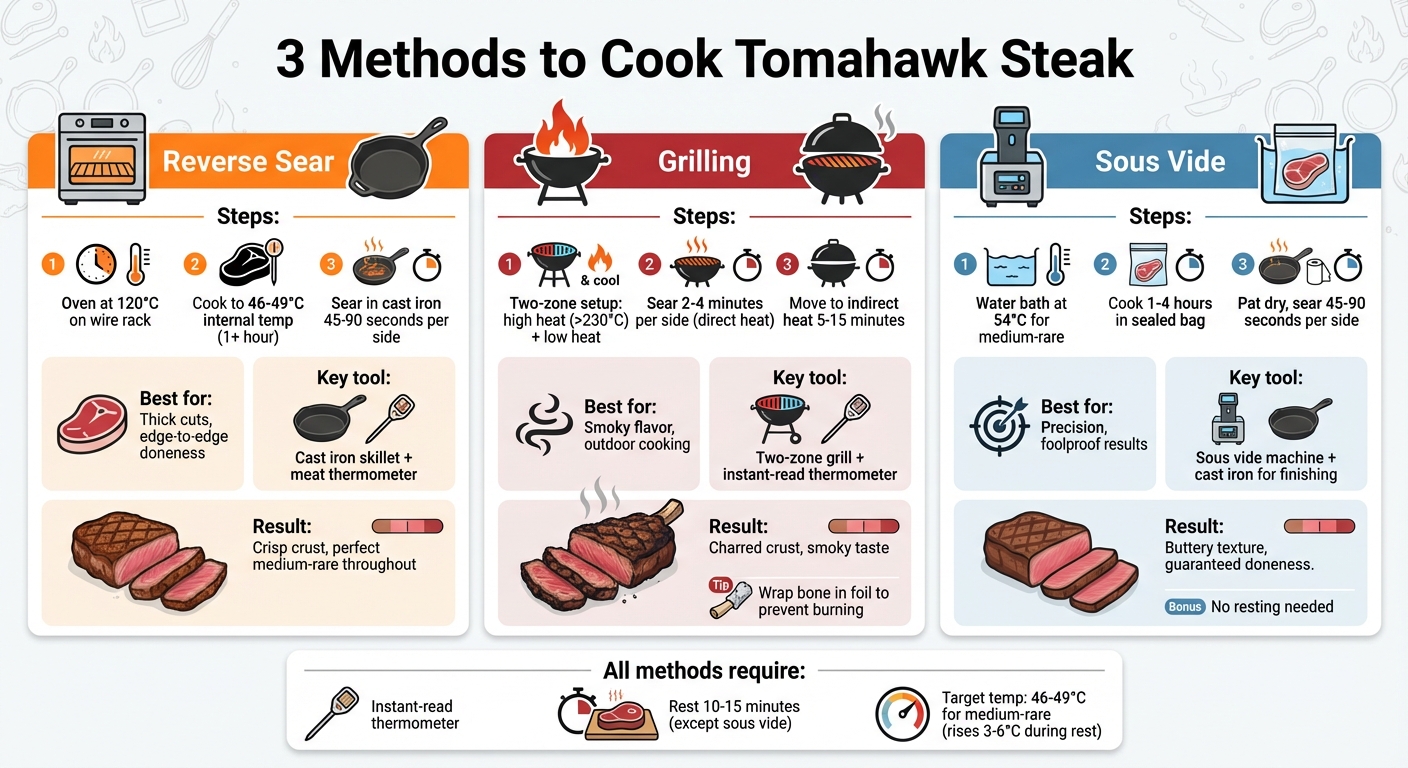
3 Methods to Cook Tomahawk Steak: Reverse Sear vs Grilling vs Sous Vide
Your tomahawk steak is ready - now it’s time to choose a cooking method. Each approach brings its own flair and works best with certain tools and techniques. Whether you lean towards the precision of an oven, the smoky char of a grill, or the reliable consistency of sous vide, you can recreate that steakhouse experience at home.
Reverse Sear Method
The reverse sear method turns traditional steak cooking upside down, starting slow and finishing with a quick sear. Begin by placing your tomahawk steak on a wire rack set over a rimmed baking sheet. This setup ensures even air circulation, preventing the bottom from steaming. Cook the steak in a 120°C oven until its internal temperature reaches 46°C–49°C for medium-rare. For a thick tomahawk, this process usually takes over an hour. Culinary expert J. Kenji López-Alt of Serious Eats highlights the benefits:
If you're looking for a steak that's perfectly medium-rare from edge to edge, with a crisp crust, there's no better technique that I know of.
The slow cooking process minimises overcooked edges and creates a pellicle - a dry surface that browns beautifully during searing. Once your steak reaches the target temperature, heat a cast iron skillet until the oil starts to smoke lightly. Sear the steak for 45–90 seconds on each side, adding butter, garlic, and fresh herbs in the last minute. Spoon the foaming butter over the steak for added richness. Stick to neutral oils like canola or grapeseed for the sear, as olive oil can burn and turn bitter at high heat.
For those who enjoy outdoor cooking, grilling offers a fantastic alternative.
Grilling Method
Grilling delivers that smoky flavour and a beautifully charred crust. Set up your grill with two zones: one side for direct high heat (above 230°C) and the other for indirect, lower heat. Start by searing the steak over direct heat for 2–4 minutes per side to build a crust, then move it to the cooler zone to finish cooking for 5–15 minutes. If you prefer the reverse sear on a grill, begin by smoking the steak at 107°C until it reaches 46°C–49°C internally, then finish with a high-heat sear. Matt Pittman, member of the Traeger Pro Team, stresses the importance of quality beef:
There's a big difference in taste when it comes to grass or grain-fed cattle. Knowing where your beef comes from will help ensure you get the best flavour possible.
For a bold smoky taste, use hardwoods like oak, or go for hickory if you prefer something milder. Oil the grill grates beforehand to prevent sticking, and wrap the exposed bone in foil to avoid burning. Always use an instant-read thermometer to check the temperature, inserting it into the thickest part of the steak without touching the bone. After grilling, let the steak rest for 10–15 minutes to allow the juices to redistribute. During this time, the internal temperature will rise by about 3°C–5°C.
Sous Vide Method
The sous vide method is all about precision and ease, guaranteeing perfectly cooked steak every time. To prepare, wrap the bone in a paper towel and secure it with butcher’s twine to avoid puncturing the vacuum-sealed bag. Set your sous vide machine to your desired temperature - 54°C for medium-rare - and submerge the sealed steak in the water bath for 1–4 hours. This extended cooking time results in a tender, buttery texture. Daniel Gritzer, Editorial Director at Serious Eats, praises the method:
Sous vide is by far the easiest, most foolproof method for nailing your ideal steak doneness.
After the sous vide bath, remove the steak and pat it completely dry before searing. Season it just before placing it in a smoking-hot cast iron skillet with neutral oil, or finish it on a high-heat grill. Sear each side for 45–90 seconds until a deep, golden crust forms. Avoid adding butter or oil to the sous vide bag, as it can dilute the steak’s natural flavours. Unlike other methods, sous vide steaks don’t need resting and can be served immediately after searing.
Tools and Equipment You'll Need
Getting that steakhouse-quality tomahawk steak at home starts with using the right tools. Whether you're reverse searing, grilling, or using the sous vide method, having the proper equipment is non-negotiable.
Essential Cooking Tools
A cast iron skillet is your go-to for searing, delivering that deeply caramelised crust that makes a steak unforgettable. If you're opting for the reverse sear method, set up a wire rack on a baking sheet. Chef Pete Geoghegan from Four Sixes Ranch Brand Beef highlights why this setup is crucial:
"The rack is important to have proper air flow for even cooking. Without proper air circulation during oven cooking, part of your steak will turn into a pot roast."
An instant-read meat thermometer is another must-have. With tomahawk steaks often exceeding 5 centimetres in thickness, guessing doneness by touch just won’t cut it. Chef Geoghegan stresses its importance: "Accuracy here is key for perfect results. Check doneness with an instant-read thermometer in the thickest part of the steak."
You’ll also need heavy-duty tongs for flipping the steak, especially when searing the fat cap and edges. And don’t forget aluminium foil - it’s perfect for loosely tenting the steak during its 10–15 minute rest, allowing the juices to redistribute without letting the meat cool too much.
These essentials are the backbone of any great steak preparation, but a few optional tools can take your presentation to the next level.
Optional Tools for Better Presentation
A basting spoon is a great addition for adding flavour and flair. Use it to drizzle foaming butter infused with garlic and herbs over the steak during the final sear. Food writer and personal chef Gene Gerrard shares this tip:
"No matter the cut, butter is key to cooking a restaurant-quality steak. Chefs often finish a steak in the oven or on the grill with a pat of butter on top."
For a polished look, wrap the frenched bone in a damp paper towel followed by aluminium foil before cooking. Gerrard explains:
"Wrapping the bone in aluminium foil is an optional step used at steakhouses to give the bone a nice appearance... it does make for a better presentation."
Finally, a sturdy carving board is essential for slicing the steak against the grain. It also doubles as a serving surface, allowing you to showcase the impressive bone alongside beautifully sliced meat for that classic "cowboy steak" vibe.
Resting, Slicing, and Serving
Resting the Steak
Once your tomahawk steak is done cooking, resist the urge to cut into it right away. Letting the steak rest for 10–15 minutes is key to keeping it juicy. During this time, the muscle fibres relax, and the juices redistribute evenly throughout the meat. To keep the steak warm without softening its crust, loosely tent it with foil. Keep in mind that the steak will continue to cook slightly while resting - this is called carryover cooking. The temperature can rise by 3–6°C during this phase. For a perfect medium-rare steak at 57°C, take it off the heat at around 53°C.
Slicing Against the Grain
After the steak has rested, slicing it properly is essential for tenderness. Always cut against the grain - this means slicing perpendicular to the thin, parallel lines of muscle fibres. As Steak University puts it:
Look for thin lines running through the steak (the grain) and cut in the opposite direction to break up tough fibres that can cause chewiness.
Start by separating the meat from the bone using a sharp knife. Then, slice the steak into 1 cm thick pieces at a slight angle. The bone in a tomahawk steak not only enhances its dramatic presentation but also acts as an insulator during cooking, making the meat near it extra juicy.
Final Touches
Before serving, drizzle the resting juices over the sliced meat to add even more flavour. For a luxurious touch, place a pat of compound butter on the warm steak and let it melt, infusing richness into every bite. Fresh herbs like rosemary or thyme can add both colour and a fragrant aroma. To finish, sprinkle a pinch of flaky sea salt for a bit of crunch, but leave the pepper until after slicing to avoid any bitterness.
For an eye-catching presentation, clean the rib bone and place it on a large wooden board or serving platter. Arrange the sliced meat around the bone to create a communal centrepiece. This style of serving fits perfectly with UAE dining traditions, where sharing a tomahawk steak among 2–6 people is a popular choice.
Conclusion
Bringing steakhouse-quality tomahawk steak to your home kitchen is easier than you might think when you follow the right steps - from proper preparation to precise cooking techniques.
Each method - whether it’s the reverse sear, grilling, or sous vide - has its own appeal. The reverse sear is perfect for thick cuts, offering consistent results. Grilling with a two-zone setup delivers that smoky, charred flavour that’s a hit at outdoor gatherings. Sous vide, on the other hand, guarantees precision with evenly cooked, edge-to-edge doneness. No matter which method you choose, a meat thermometer is your best friend for ensuring the perfect level of doneness.
To take your steak to the next level, finish it off with a drizzle of resting juices or a dollop of compound butter. These small touches can transform a great steak into a memorable one.
Of course, the foundation of a truly exceptional tomahawk steak lies in the quality of the meat itself. At Fin & Bone, we prioritise premium, sustainably sourced cuts to ensure rich flavour and tenderness. As Nagi from RecipeTin Eats puts it:
Animals that lived a good life will produce better-tasting meat (think battery chickens vs free range).
FAQs
Why is the reverse sear method ideal for cooking a tomahawk steak at home?
The reverse sear technique works brilliantly for cooking a tomahawk steak, as it guarantees even cooking from edge to centre. Starting with low, steady heat allows the steak to cook uniformly, preventing overdone edges or a raw middle. After that, a quick blast of high heat creates a golden, caramelised crust that seals in all the juices and flavour.
This approach is ideal for thick cuts like tomahawk steaks because it gives you greater control over the cooking process, resulting in a tender and juicy steak every time. To nail the perfect doneness, use a meat thermometer to keep an eye on the internal temperature.
What’s the best way to keep my tomahawk steak juicy and tender after cooking?
To keep your tomahawk steak irresistibly juicy and tender, give the reverse sear method a try. Here’s how it works: begin by slow-cooking your steak either in the oven or on a grill set to a low temperature. Aim for an internal temperature of around 49–52°C (120–125°F). Once you hit that sweet spot, crank up the heat and sear the steak until it develops a rich, caramelised crust.
After cooking, let the steak rest for about 10 minutes before slicing into it. This short resting period allows the juices to settle, making every bite as tender and flavour-packed as possible. For the most accurate results, a meat thermometer is your best friend - it takes the guesswork out of achieving the perfect doneness.
What should I look for when choosing a premium tomahawk steak?
When picking out a premium tomahawk steak, pay close attention to quality, sourcing, and how it can be prepared. Opt for beef that is grass-fed and locally sourced, as this often delivers a richer flavour and supports sustainable practices. For the best taste and texture, look for steaks that have been dry-aged for at least 28 days - this process enhances both tenderness and flavour complexity.
Another key factor is marbling - the streaks of fat running through the meat. A well-marbled steak ensures juiciness and creates that buttery, melt-in-your-mouth experience. To truly enjoy a top-tier tomahawk steak, choose cuts from trusted suppliers who emphasise ethical and sustainable farming. This not only guarantees superior quality but also reflects a commitment to responsible eating.


